Week 6: October 13, 2014
Live Action GitHub Tutorial!
- Create new repository
- Add folders for HW
- source
- export
- images
- Create commit with source file
- Create commit with export file
- Create commit with image file
- Create commit with README.md
- Create commit with LICENSE.txt
- Publish!
Project Documentation Questions?
Any questions or difficulties before we move on?
Meet the Laser Cutter (a.k.a. Laser Engraver)
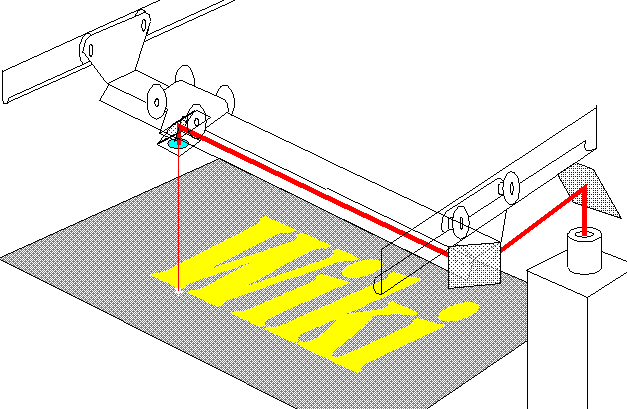 Image credit: wikipedia
Basic Components of a Laser Cutter
- Powerful laser beam directed by mirrors
- X/Y gantry moves around a set of "flying optics"
- Mirrors
- Lens to focus beam into cutting point
What Can a Laser Do?
Spikenzie Labs has a great write-up.
Meet our Laser Cutter
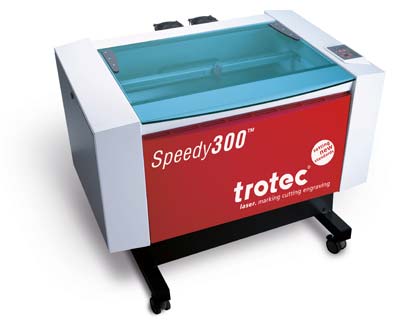
Trotec Speedy 300
- Maximum material size of 17"x29"
- Up to 120 watts of cutting power
- Air assist (ALWAYS USE THIS)
- A lab computer drives it
Supported Materials
Some materials are good for cutting, some only for engraving:
- Wood (untreated only)
- Plastic
- Leather
- Paper/paperboard
- Cardboard
- Some cloth
Some materials are NEVER OKAY. For example, anything with chlorine in it will off-gas chlorine as it vaporizes and permanently damage the lens
- NO PVC
- NO VINYL
- NO STYROFOAM
- Don't even engrave Moleskine notebooks.
Basic Laser Illustrator Workflow
Start with the dFab Laser Template - it contains swatches of all colors supported by the laser.
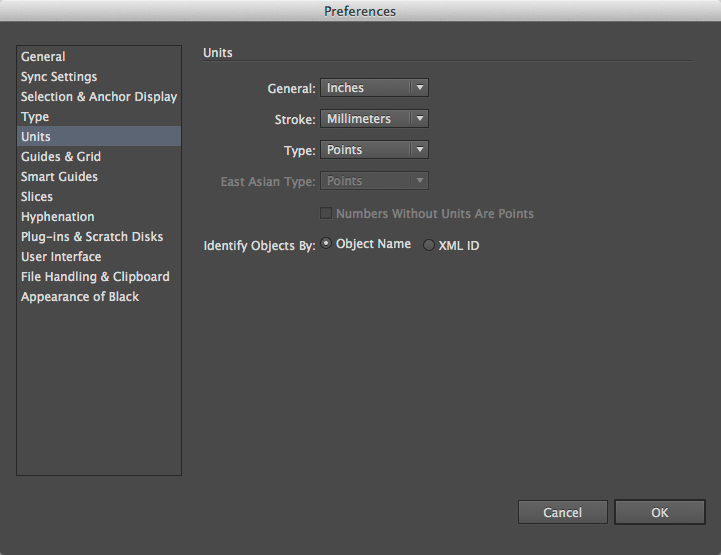
Make sure your Units settings in Preferences are correct:
- General should be set to Inches
- Stroke should be set to Millimeters
- Type should be set to Points
Put your paths for cutting on the "Cut" layer.
- Make sure Stroke color is the "Cut" color (pure red, a.k.a. RGB 255,0,0, a.k.a. #FF0000).
- Make sure Stroke Weight is set to 0.001mm. This is also known as "hairline width".
- Make sure Fill is set to none.
Put your paths for engraving on the "Engrave" layer.
- Make sure Stroke color is the "Engrave" color (pure black, a.k.a. RGB 0,0,0, a.k.a. #000000).
- Make sure Stroke Weight is set to 0.001mm. This is also known as "hairline width".
- To engrave only the outside of the path, make sure Fill is set to none.
- To engrave the inside of the path, make sure Fill is set to the "Engrave" color.
Update the "Positioning" Layer so that the orange box matches the actual size of your material.
Delete the helpful labels, etc. in the Layout layer, you won't need them.
Performing the Cut from Illustrator
Bring your Illustrator (
.ai) file to the Trotec lab computer on a USB stick.Open it in Illustrator. Select File | Print... to send it to the engraver.
That's it*!
* - That's definitely not it. Keep reading.
Actually Performing the Cut from Trotec Job Control Software
Open the Trotec Job Control software.
Review the settings for each color in the print job.
- Mode - each color can be set to Cut, Engrave, Ignore, or Position
- Cut - the laser will follow the vectors for each path of this color at the specfied power, speed, and frequency settings.
- Engrave - the laser will scan back and forth over the interior of each path of this color at the specified power, speed, and frequency settings.
- Ignore - paths of this color will be skipped for this run.
- Position - tells the laser the bounds of the material. Use this with the orange Position layer only.
- Speed - how quickly to move the laser while it is powered on
- Power - percentage (0-100%) power to apply to the laser when it is powered on
- Frequency - (10000 - 60000) the laser isn't continuous - it pulses. A higher frequency results in smoother cuts but requires a lower speed.
- Use air assist? ALWAYS USE AIR ASSIST.
- Mode - each color can be set to Cut, Engrave, Ignore, or Position
Ready to cut, yet? ALMOST.
Preparing the Laser and Work Piece
Make sure both air vents are open.
Make sure all air pumps are switched on. This switch is located outside the laser booth.
Make sure the laser is powered on.
Place your material at the 0x0 point in the upper-left corner of the bed.
Focus the laser:
- Move the lens assembly out over your material
- Hang the focusing guide on the lens assembly
- Lower the bed so the guide is clear of your material.
- Use the onboard controls to raise the bed until the moment that the guide falls off.
Close the cover.
Finally: FIRE THE LASER.
WATCH YOUR LASER JOB. DO NOT LEAVE THE ROOM FOR ANY REASON WHILE THE LASER IS ACTIVE.
Safety!
Once again: WATCH YOUR LASER JOB. DO NOT LEAVE THE ROOM FOR ANY REASON WHILE THE LASER IS ACTIVE.
In the event of fire or lots of smoke:
- Open the cover of the machine to immediately stop all laser activity.
- If the fire doesn't go out on its own, place the burning piece in the fire bucket in the corner of the laser booth!
Laser Materials Testing
Today we'll be testing to find some good laser settings for cutting and engraving your materials!
Pair off to make this go faster - we'll have ~8 groups using the laser today.
For each material that you have, we're going to run through the following test procedure.

Note that there are 12 different test color swatches in the dFab Laser Template.
- Follow the above steps to send a job to the Trotec control software.
- No need to worry about artwork for the Cut and Engrave layers.
- Set all layers to Ignore except for the orange Positioning layer.
- Choose 3 colors to try out Cut settings on.
- You're varying speed, power, and frequency.
- Carefully write down which settings you applied to which colors.
- Choose 3 colors to try out Engrave settings on.
- You're varying speed, power, and frequency.
- Carefully write down which settings you applied to which colors.
- Run the laser job, following all safety measures.
- Afterwards, examine and record the results.
- Did the cut go all the way through?
- Does the material surface look very burned?
- Do the edges of the cuts/engraving look smooth?
- Iterate! - Based on your result, choose 3 new settings to try for Cut and 3 new settings to try for Engrave.
- Repeat steps 1-6 using the remaining 6 test swatch colors.
A good Cut should:
- Use just enough power to cut through the material without scorching it (adjust power).
- Leave clean edges without many jagged areas (trade off frequency and power).
- Be pretty fast (trade off speed and power).
- Succeed in one pass. Thicker (≥1/4") materials may need multiple passes, however.
A good Engrave is similar to a cut, but should by no means go through the material. The goal of an Engrave is usually to burn away a little material in order to add text or other important markings to the work piece.
If, after two iterations, you are happy with your results, you may stop. Otherwise, rotate your material 180º and try again.
Be Sure to Document Your Work
- Photograph the results of each test run.
- Carefully record the settings you used and the results for each.
We are going to share all of our results in a shared repository.
Please see the IA Fablab 2014 Fall Laser Materials Settings repository for more info on how to share your results.
Meanwhile...
Only a pair of people will be lasering at a time. While you're waiting for the laser, please review these interesting lasercut designs from Thingiverse:
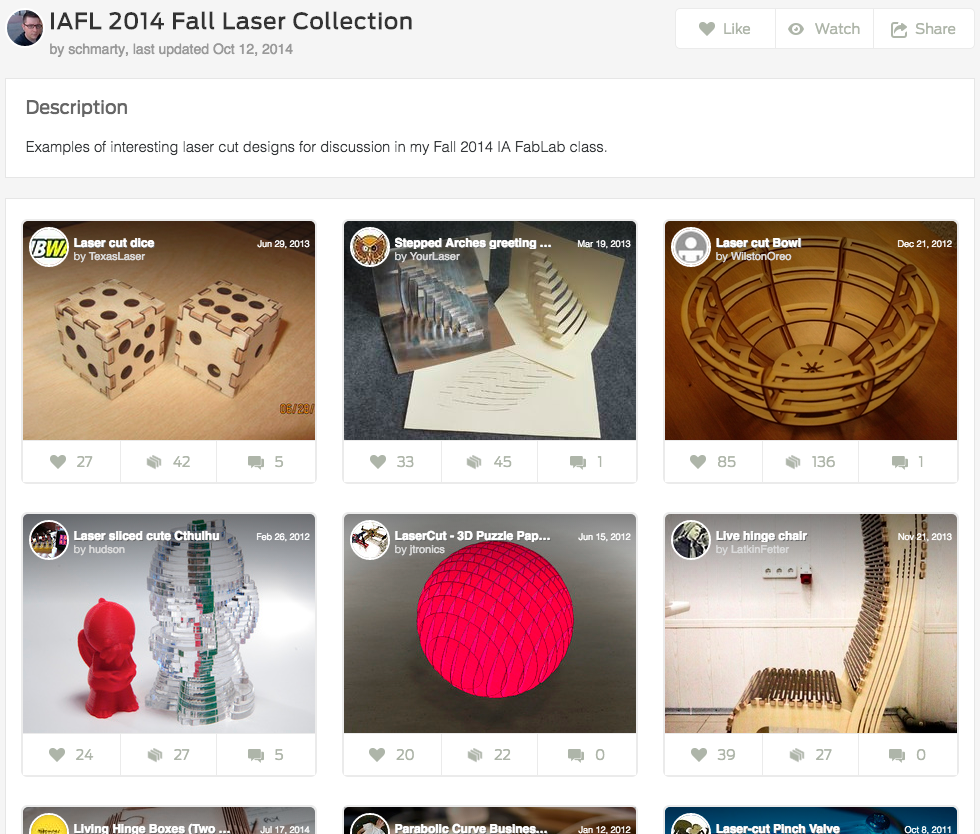 IA FabLab 2014 Fall Laser Collection
Think about the techniques you are seeing.
- What features or properties do they give to the resulting assembly?
- What limitations might these techniques have?
- How might they be accomplished in Illustrator? OpenSCAD?
You can also use this time to:
- Fix up your GitHub repositories for HW1, HW2, or project 1.
- Do the fall break reading.
- Get a head start on your laser cut design for HW3 (due Mon. October 27th).
Homework
FALL BREAK!
No class next week.
Enjoy the break! And burn things with the laser!
Before October 27th Class - Do This
Follow the instructions on the IA Fablab 2014 Fall Laser Material Settings repository to turn in your material testing results.
Before October 27th Class - Do This
Design a simple form to cut/engrave on the laser using your own materials.
- "Simple" meaning something you can cut out of a single sheet of a material of your choice no larger than 18"x12".
- You should use Illustrator (start with the template!) to create your design.
- Remember to cut during dFab Laser Hours.
- Note that the dFab will be closed Monday and Tuesday October 20 and 21st.
- Create a GitHub repository (name it
IAFL2014-HW3) for your design including:- A
sourcefolder with your Illustrator (.ai) file. - An
imagesfolder with images of your finished assembly. - A
README.mdfile including:- The assignment description.
- About 200 words describing your project.
- The laser settings (speed, power, frequency) that you used for cutting and/or engraving.
- A
Before October 27th Class - Read this
The System of Objects (excerpts from Structures of Interior Design and Structures of Atmosphere) by Jean Baudrillard (link)
We'll go over this in class on October 27th.